Friday, 5 September 2014

Cache Purge

To Purge Cache


Cache entries can be purged with the following options :

1) Presentation Services (Using SQL Commands)
2) Repository
3) Event polling table

Cache will hold the queries for all the logical request issued by the user in OBIEE Application. These cache entries will be stored in a log file. And the details of these cache entries willl be controlled by the log level set.

log level generally controls the amount of information that is stored for each and every cache entries in log file.


Presentation Services (Using SQL Commands)

The Cache entries can be purged in Presentation Services using SQL Commands. Only Administrator can purge the cache entries.

To check the physical query in cache for the logical request that is issued by the user:
Manage Sessions will hold all the list of queries for all the logical request that issued by the user in OBIEE Application.

Go to Administration -> Manage Sessions

To clear the cache entries:
There are different types of SQL commands that is issued in the Issue SQL to clear the cache entries . Each and Every SQL Commands servers different purpose:


Go to Administration ->  Issue SQL -> SQL Commands

1. Call SAPurgeAllCache();  :  This SQL Purges all the cache entries in one shot.

2. Call SAPurgeCacheByTable('DBNAME', 'CATNAME', 'SCHNAME', 'TABNAME');This SQL Purges     the cache entries of a specific table.

3. Call SAPurgeCacheByTable('DBNAME');This SQL Purges the cache entries of a specific database.

4. Call SAPurgeCacheByQuery(SELECT * FROM TABLE WHERE EMP_ID = '1');This SQL Purges         the cache entries of a specific query.


Repostiory

The cache entries can be purged through repository.

Go to Manage->Cache 


Selecting Cache from Manage, will navigate to a Cache manager window:


Cache manager will hold the list of cache entries. Each entry in a cache manager indicates the queries executed by the user at a specified interval of time. 

To purge the specified query, right click the entry and select purge which would delete the selected entry.

Rightclick -> Select Purge


(or)

To purge all the entries, 

Click Edit-> Select All-> Purge


Event polling Table:

Event polling table purges cache based on a event. It allows report to show only the recent data by purging the cache entries.

Event polling table has the following columns:

Catalog Name (CHAR/VARCHAR) - catalog name where the updated physical table resides.
Database Name (CHAR/VARCHAR) - database name where the updated physical table resides.
Other (CHAR/VARCHAR) - null (can be used if required in future)
Schema Name (CHAR/VARCHAR) - schema name where the updated physical table resides.
Table Name (CHAR/VARCHAR) - table name which is updated.
Update Time (DATETIME) - refers to the time table updated.
Update Type (INTEGER) - specifies the type of update.


Whenever the fact or dimension tables gets loaded, then an entry will be populated in the Event polling table. Cache will be purged, once the event polling table is populated with an entry. After purging the cache, the entry in the event polling table will also be deleted.

Deployment

Deployment

There has been lot of changes in OBIEE 11g as far as deployment is concerned. And we generally have two major components in OBIEE:

1. Repository
2. Catalog


Repository : It is nothing but metadata. Dimensional modelling is implemented in repository. Dimensions, Fact and Relationship between dimensions and Fact is created in repository.

Catalog : Catalog holds the objects that is created at the presentation Service. It holds objects like Reports, Filters, Prompts, Pages and Dashboards. And it mainly contains two sets of folder:

1. My Folder   (Single Application User Specific)
2. Shared Folder (Application Users Specific)


To Deploy a repository:

OBIEE 10g:

In OBIEE10g, Deployment of repository and catalog is done with configuration files.We will deploy the repository in OBIEE 10g with NQSConfig.ini file. OBIEE Server reads this file during startup. And in nqsconfi.ini file under repostory section, we can find the below statements

Syntax : logical_name = repository_name, default; where default is optional


The statement in above screenshot where Star = Sales.rpd, DEFAULT indicates that Sales.rpd is currently running in the OBIEE Server. To deploy a new rpd called "Total_Sales",we should edit the repository section like

Star = Total_Sales.rpd, DEFAULT;

After making these changes, need to restart the Servers in order to activate these changes.

OBIEE 11g

We can deploy the repository using two options:

1) we can change the repository name in nqsconfig file and restart the server.
2) Login into enterprise manager

      1) goto busineessintelligence -> coreapplicaton->Deployment->Repository
      2) In Repsitory tab,under BI Server repository we could find default rpd. This default rpd holds a             value 'MNC_CV_BI0044' which is the currenlty running rpd.


   3) And if we need to deploy the new rpd, then click Browse under upload BI Server Repository. And        need to provide the repository password.   
   4) Click apply, then the default rpd will get changed as shown below:


  5) if default rpd takes the uploaded rpd, then click activate changes
  6) After activating the changes, navigate to Overview tab and click restart.


---------------------------------------------------------------------------------------------------------------------

To deploy catalog

OBIEE 10G:

In OBIEE 10g, catalog is deployed using a configuration file instanceconfig.xml.

Instance Config file is located in OBIEE10g and OBIEE 11g in the below path:

10g: Oracle BIData\Config\instanceconfig.xml

11G: ORACLE_INSTANCE/config/OracleBIPresentationServicesComponent/coreapplication_obipsn

In the below screenshot, we could see the entries in instanceconfig file. And we could find an entry with Catalog Path.


Sales is a catalog where we have objects like dimensions,fact, reports, filter, pages and dashboards. 

if the new catalog (totalsales)  is to be deployed then we need to change the entry as below:


2) Using Archive and Unarchive option  (Catalog Manager)
 if we are migrating only the newly created dashboards/reports to a production then in that case, we can deploy the catalog using archive and unarchive option in catalog manager.Since development environment may have some unwanted reports, the best way is to move only the newly created objects rather than moving the entire catalog.   

1. Open the development catalog in offline mode using catalog manager.


2. Take a copy of the reports and dashboard from child folder using archive option in catalog manager.

Select the folder and click File->Archive


3. Open the production catalog in offline mode using catalog manager.
4. Then paste the reports and dashboard to the parent folder using unarchive option in catalog 
manager.


Select Folder and Click File -> Unarchive


Note : Archive is done on child folder and Unarchive is done on parent folder.

Example :

Let us consider the below example.


Existing Catalog (Production)
 For Sales Subject area, Sales dashboard is created with a page Sales which holds the yearly report.

Current Catalog (Development)
New page Activations is created under Sales dasboard which holds activation report. Two new reports
Weekly Sales report and activation reports is created for Sales Subject area. Weekly Sales Report is placed in Sales page under sales dashboard  and activation report is placed in Activation page under sales dashboard.

To deploy the reports and pages to Production environment:

Dev environment many contain few test reports or sample reports that is created by developers for some testing purpose which might not be needed in production environment. Its important to have only the required objects in production environment.


Open the development catalog in offline mode

take a copy of reports and dashboards from dev using archive option in catalog manager and save it as dev.catalog.

Open the production catalog in offline mode

Paste the dev.catalog to the shared folder in production catalog using unarchive option in catalog manager
A

OBIEE 11G:

1 and 2 option can be used in OBIEE 11g as well.

Apart from this, there is an additonal functionality in OBIEE 11G.

3) Using Archive and Unarchive ( OBIEE Application - Presentation Service)


To move the catalog from one environment to other we will archive the required objects from the source and then unarchive the objects to the destination/target environment.

Login into OBIEE Applciation and Goto Catalog.


on the left side of the pane you will get my folder and shared folders. And right side, u will get the list of sub-folders created under the folder that is selected in the left pane. All the objects created, will be saved in this sub-folder.


In the above screenshot, under shared folder we have a sub-folder called Sample which holds the reports that is placed in dashboard. Therefore to take a copy of new reports that is created. 

Select the sub-folder sample and Go to More. Then Select Archive

or

Select the sub-folder sample and Select Archive which is at the end of the left side pane.


Once archive is selected, then the following screen appears.


Check the Keep Permissions and Keep Timestamps and select OK.After this, sample.catalog file will be generated and saved in the location provided.


Login into the OBIEE environment where new objects to be deployed. Then go to catalog.

Folder Structure: Shared Folder -> Sample

Archive (copy) should be done from child folder (i.e) from sample.
Unarchive (paste) should be done on parent folder, in this case it is shared folder.

To unarchive the new objects

1. Go to catalog -> Select Shared Folder-> More -> Unarchive

2. Go to catalog -> Select Shared Folder -> Unarchive (at the end of left side pane)

Once Unarchive is selected, the following dialog box appears.


Need to browse and select the archive file.Select the archive file development.catalog which holds the copy of new objects that is created.

REPLACE:

The replace prefrences dialog box basically holds the following options:

1. PASTE: Allows to paste all files and to overwrite all files including the read only files.
2. ALL : Allows to paste all files and to overwrite all files except the read only files.
3. OLD: Allows to paste all files and will overwrite the files only if it is loader than source.
4. NONE: Allows to paste all possible files but will not overwrite any files.


ACL:

The ACL preferences dialog box has the following options:

1. INHERIT : Initiates the object permissions from the parent folder
2. PRESERVE : Preserves the object permissions from the original
3.CREATE : Preserves the object permissions from the original and creates accounts and mapping depending on the mode and type of owner.


Once these entries are selected, click ok. Then the files will be unarchived to the corresponding folder.


Wednesday, 3 September 2014

To Enable Cache

Enable Cache

Cache: Cache generally holds the queries for the report that is executed by the user in presentation services. This will increase the query response time if the same type of query is accessed frequently.

Cache Queries will be stored in the log file. The level of detail in the log file will be controlled with log level. In OBIEE, We have different types of log level. They are

log level = 0 (No logging)

log level = 1 ( Sql statement issued by the client application, query processing time, query status)

log level = 2 ( level 1 details and repository name, bmm, subject area, queries issued against Cache & physical database, rows counts for queries issued against cache and physical database and row counts returned to the client application) 

log level = 3 ( level 2 details and logical query plan )

log level = 4 ( level 3 details and query execution plan)

log level = 5 ( level 4 details and logs intermediate row counts at various points of execution)


How to enable cache:

Cache can be enabled in two ways:

1) Nqsconfig file (in OBIEE 10g and OBIEE 11g)

Nqsconfig file is an initialization log file used by Oracle BI Server during start up. Each instance of Oracle BI Server will have its own Nqsconfig file. In OBIEE 10g, repository deployment is done with the help of Nqsconfig file whereas in OBIEE 11g it can also be done with Enterprise Manager

NQSConfig file will be located in the following path in 10g and 11g:

OBIEE 10g : D:/OracleBI/Server/Config

OBIEE 11g : OBIEE11G\instances\instance1\config\OracleBIServerComponent\coreapplication_obis1/

NQS Config file will have the following entry:

[Cache]
ENABLE = YES

To set the cache, it should be equal to YES.


2) Enterprise Manager (Only in OBIEE 11g)

To enable cache through Enterprise Manager, need to follow the below steps:

1) Login into OBIEE Enterprise Manager 
2) Then navigate to Business Intelligence -> Core application -> Capacity management -> Performance Tab
3) Under Performance tab, you will find a section Enable BI Server Cache. To enable cache,
  •  Release the lock using lock and edit configuration, only then any editing is possible in EM.
  •  Select Cache enabled.
  •  Click Activate changes and then restart the server to apply these changes.


Tuesday, 2 September 2014

OBIEE Variables

Variables in OBIEE


Variables used to hold a value at any point of time.

In OBIEE, there are 4 different types of variables. They are

1. Repository Variables
2. Session Variables
3. Presentation Variables
4. Request Variables


Initialization block: Initialization block is used for assigning a value to a variable.With the help of initialization block,value of the variable refreshed dynamically.

To create a new initialization block, Select Manage and then choose variables


Once initialization block is selected, following screen appears:


Initialization block is scheduled for a time which is 10:08:54 AM daily. The frequency for this refresh may be after evey hour, so that after every hour the queries will be executed and variables will be refreshed with the value that a query returns.

Edit data source: Edit data source has the queries of the initialization block and the connection pool details through which connection to database is established. With the help of connection pool, queries in an initialization block will be executed against the database.After clicking Edit data source, the following screen appears:


Edit data target: Using Edit data target , variables can be created for the initialization blocks. To create a vairable, click New then the variable dialog bog will appear


Following Variable dialog box appears, Name, type, initialization block and default initialization should be given.

The following screen shows the initialization block completed year. 


Repository Variable: Repository Variable holds a value that will be same for all users. There are two types of  repository variables:

1) Static Variables
2) Dynamic Variables

Static Variables : Static variables holds a constant value which will not be changed frequently or any point of time. Its value can be changed by administrator.

Dynamic Variables : Dynamic Variables hold a value that can be refreshed dynamically. The values populated to these dynamic variables using initialization block query.

Creation of Repository Variables:

To Create a variables, Click Manage and Select Variables


Then the following dialog box appears. To create variables, Select Action and Choose New -> Repository-> Variable


How to set the variable type:

Once the variable is created then the variable dialog box appears, then we can set the variable type, can select static for static variable or dynamic for dynamic variable


For a dynamic variable, initialization block has to be assigned, which will have queries that is executed at different intervals of time.Static variables will hold constant values rather than values that would go for a change frequently.

How to uses repository variable in repository


How to use repository variable in report column formula:


How to use variables in prompts


How to use repository variable in report filter:

In analysis, we can filter the report with advanced option. In advanced we have three types of variables: Presentation, Repository and Session Variable. Variable name should be provided.


How to use a repository variables in Views 

In views like static/Narrative view, repository variable can be accessed with the following syntax:

@{biServer.Variable['variable name']}


Session Variables:

Session Variables holds different values for different user. Its value may vary across user sessions.  Session variables generally used for security purpose. There are two types of session variables:

1) System Session Variable
2) Non system Session Variable


Initialization block : Initialization block populates the value for the variable. Click Manage and Select Variables. Then the following screen appears, Click Action ->New->Session->Initialization Block


System Session Variables: System session variables holds some reserved names. It cannot be used for other purposes.Values populated to these variables using initialization blocks. Each and every active BI Server will generate session variables and initialize them.

Example : USER, LOGLEVEL,PROXY etc

These variables used by BI Server and  BI Presentation Server for specific purpose.

Non System Session Variables: Non system session variables generally used for security purpose since it holds different values for different user. Values populated to these variables with initialization blocks.

Example : Let us consider a geography authorization is implemented. In this case lets assume there are
 Geography :India & Singapore.
 Users : User1 & User2

And in this case User 1 should be able to see sales related to India and User 2 should be able to see only the sales happening at singapore.

When user logins into the application, we can retrieve the groups associated with the user using session variables. With this session variable value (India), filter can be applied to the facts and dimensions. Therefore both dimension and fact will only display India data for the user.

Creation Of Session Variables:


Row wise initialization :

If a variable is expected to hold more than one value or array of values then row wise initialization option is enabled in initialization. With this row-wise initialization, a variable can hold array of values.

Use Caching 
 if cache is enabled, then the request of the query will be stored in the server.


Presentation Variables :

Presentation variables is created in the OBIEE Application and it is not created at the repository level.
Presentation variable is created using Column prompt or Variable Prompt. Presentation variable holds more than one value. It holds values that a user selects from the prompt.


Example : A column prompt is created for Year. And here Sel_Year presentation variable is created using set a variable option. And it holds the year that users selects from the prompt.


Example : A variable prompt is created for presentation variable Sel_Year.By default, it hold the year values. And it will hold the year that users selects from the prompt.


Presentation variable can be used in report filter:


Presentation variable can be used in static/narrative views as shown below:


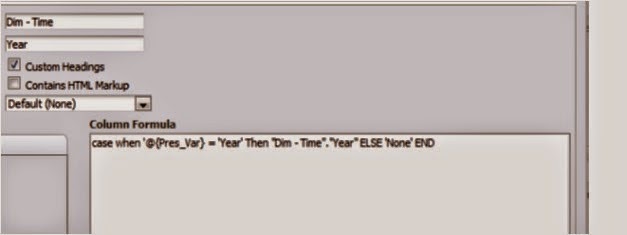
Presentation variable can be used in  a report column formula as shown below:


Presentation variable can be used in  a report column heading as shown below:


Request Variable:  Request variable is created with the help of the column prompt. With Set variable option in column prompt, request variable is created and initialized. Request variables override the values of session variable.

Let us consider  we have a session variable type which holds the value '1'. And we have created a request variable with the name 'type'. This type will hold a value that is selected by the user from the prompt.

A report is filtered with this type session variable. But prompt will have this request variable, which holds the value that is selected by the user from prompt.

When dashboard is executed, the report will be filtered with the type variable. but the type will hold the value that is set by request variable rather than session variable.


In general Request variable is used to override the value of session variable.